Table of Contents
Best Italian Rainbow Cookies Recipe – Easy & Authentic
ine slicing into a jewel-toned dessert that’s equal parts eye-catching and delicious. These colorful layered treats combine almond paste-enriched cake, fruity jam, and a glossy chocolate finish. Though called “cookies,” they’re actually thin slices of a delicate, multi-layered cake that’s as fun to make as it is to serve.
Store-bought versions often lack the rich nutty flavor and tender texture of homemade. With this recipe, you’ll craft bakery-quality results using simple tools like a stand mixer and parchment paper. The secret? Real almond paste—not extract—gives the batter its signature depth, while raspberry jam adds a bright, tangy contrast.
This guide walks you through every step, from mixing the batter to achieving those iconic vibrant layers. You’ll learn how to assemble the cake sheets, spread jam evenly, and slice cleanly with a serrated knife. While the process requires patience (think chilling time between layers), the payoff is a dessert that’s as stunning on a holiday tray as it is satisfying with afternoon coffee.
Key Takeaways (Italian rainbow cookies)
- These treats are technically thin slices of layered almond cake, not traditional cookies
- High-quality almond paste is essential for authentic flavor and texture
- Requires basic baking tools like mixing bowls, sheet pans, and parchment paper
- Chilling between steps ensures clean layers and easy handling
- Perfect for special occasions or as edible gifts
A Brief History and Cultural Significance
Few desserts tell a story as vividly as these layered almond cakes. Born in early 20th-century bakeries, they became edible symbols of pride for immigrants adapting Old World traditions to New World ingredients. Their iconic stripes mirror the Italian flag, a nod to heritage that transformed simple sweets into cultural icons.
From Sicilian Roots to American Bakeries
Sicilian settlers brought almond-based desserts to cities like New York and Philadelphia. Bakers combined almond paste with basic pantry staples—flour, sugar, eggs—to create dense, moist layers. Red and green food coloring turned the cake into a patriotic display, while raspberry jam added a fruity tang.
Neighborhood Legends and Modern Adaptations
By the 1950s, these treats dominated pastry cases in Italian-American enclaves. Family-owned shops perfected the recipe, stacking layers under weights for that signature tight crumb. Though called “rainbow,” the classic trio of colors remains tied to tradition rather than literal hues.
Today, versions from South Philly bakeries still use wax paper and chilled batter—techniques passed through generations. The chocolate coating? A later addition that balanced sweetness with bitter richness. Whether served at weddings or holidays, each bite carries a century of culinary ingenuity.
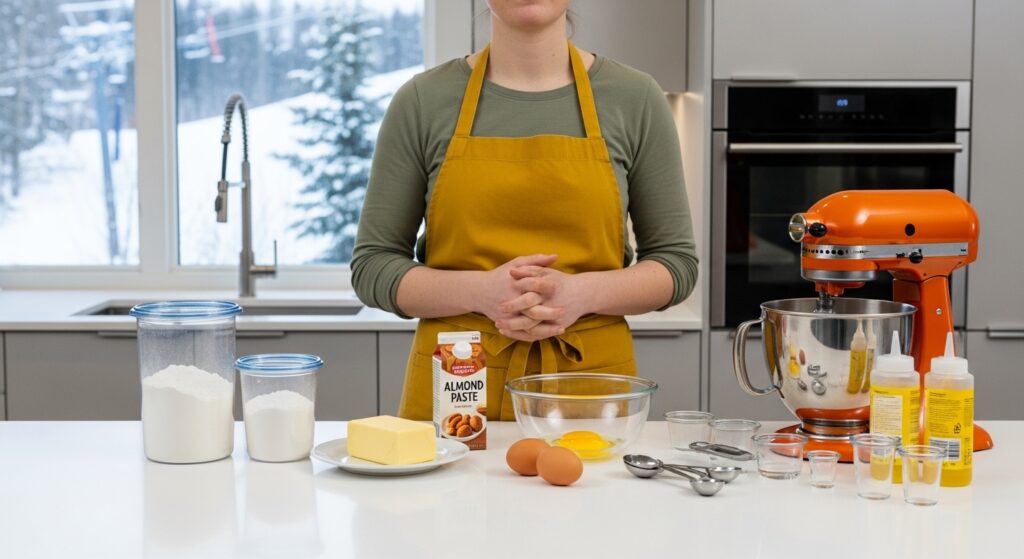
Ingredients and Essential Kitchen Tools
The foundation of memorable desserts lies in two elements: quality ingredients and reliable tools. Let’s explore why almond paste trumps marzipan and which gadgets ensure success.
Almond Paste: The Flavor Game-Changer
Almond paste contains 60-70% ground almonds and just enough sugar to bind—marzipan reverses this ratio. Pastry chef Elena Conti notes:
“Marzipan’s sweetness overpowers delicate layers. Real almond paste delivers that earthy richness your batter needs.”
When softened with butter and sugar, almond paste creates a dense crumb that holds jam layers without crumbling. Store-bought marzipan often includes artificial flavors, which clash with raspberry preserves.
Tools That Make or Break Layers (Italian Rainbow Cookies)
A stand mixer with paddle attachment breaks down almond paste evenly—hand mixers leave lumps. Line pans with parchment paper slings (overhanging edges) for seamless cake removal.
Use an offset spatula to spread jam thinly between layers. For precision, weigh ingredients with a food scale. Even 5 extra grams of flour can make layers dry.
Preparation Steps and Timelines(Italian rainbow cookies)
Timing transforms good desserts into showstoppers—here’s how to master the clock. Unlike quick-bake treats, this recipe thrives on strategic pauses. You’ll alternate between mixing, baking, and chilling to create stable layers that hold their shape.
Important Prep, Cook, and Chill Times (Italian Rainbow Cookies)
Follow this roadmap for flawless results:
- Prep (25-30 minutes): Cream butter and almond paste until smooth. Divide batter evenly into three bowls for coloring
- Bake (8-12 minutes per layer): Spread batter thinly on parchment-lined sheets. Overbaking dries layers—pull them when edges just turn golden
- Chill (2-8 hours): Refrigerate stacked layers under weights. This melds flavors and prevents crumbling during slicing
Reading Through Instructions for Best Results
Pastry chef Marco Rossi advises:
“Map your steps like a subway route. Missing one chill session derails the whole project.”
Weigh ingredients before starting. Use room-temperature butter for smoother blending. If batter feels thick, add 1 tsp milk—but never overmix. Track time with a kitchen timer, not guesswork.
Pro tip: Bake all layers consecutively to maintain oven temperature. Let sheets cool completely before stacking with jam. Rush these steps, and you’ll fight sliding layers later.
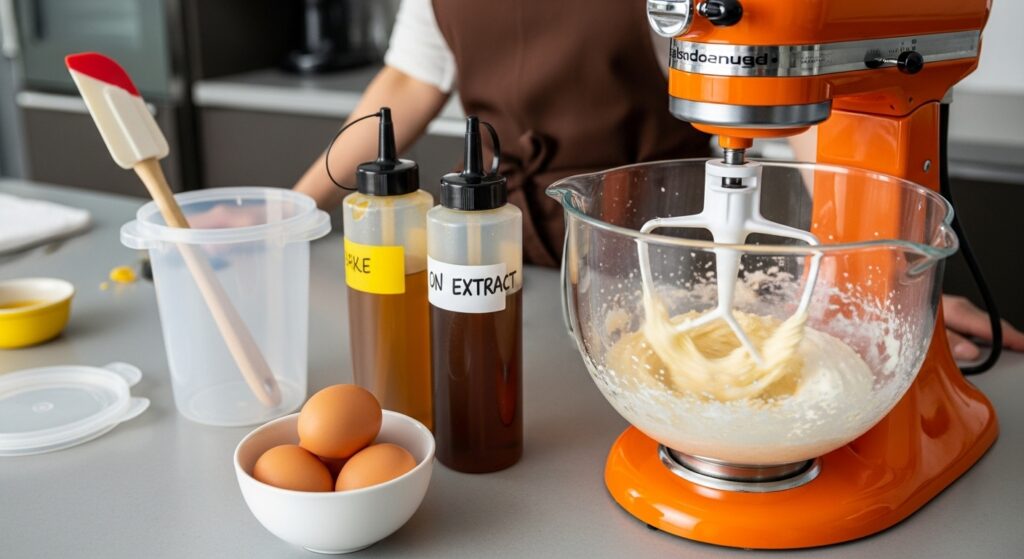
The Baking Process Explained (Italian Rainbow Cookies)
The magic begins in the mixing bowl. Start by creaming almond paste with softened butter and sugar until smooth. This creates the base for your batter’s rich, nutty flavor. Add eggs one at a time, mixing thoroughly after each addition.

Mixing Batter and Incorporating Egg Whites
Separate egg whites and beat them to stiff peaks—they should hold sharp ridges when you lift the whisk. Gently fold this foam into the almond mixture using a spatula. Overmixing deflates the batter, so work in sweeping motions until no white streaks remain.
Divide the batter into three portions. Add food coloring to two batches, leaving one plain. Use gel colors for intensity without thinning the mixture. Aim for vibrant hues that’ll shine through after baking.
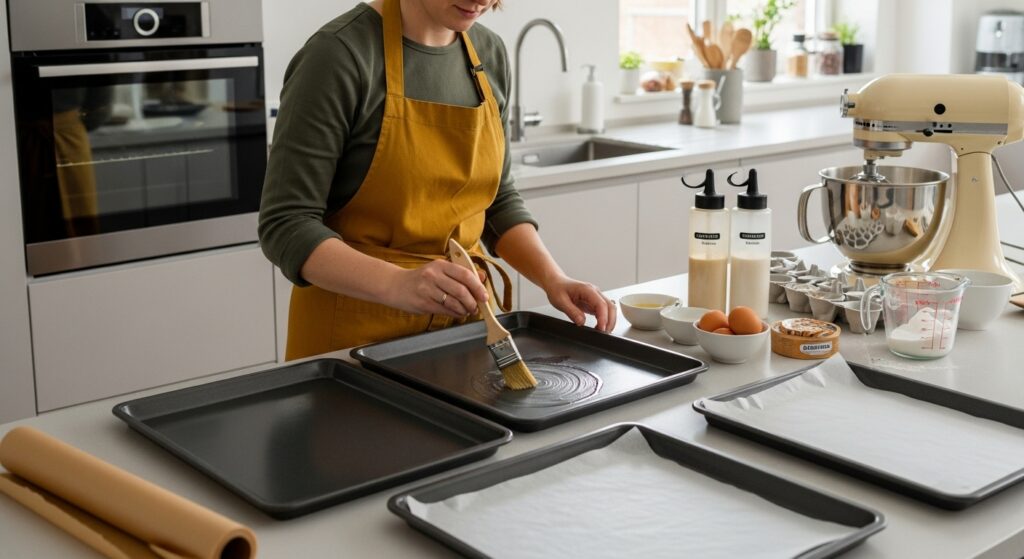
Baking Thin, Paper-Lined Layers (Italian Rainbow Cookies)
Line a rimmed sheet with parchment paper. Spread each colored batter into a thin, even layer using a small offset spatula. The ideal thickness? About ¼ inch. Bake at 350°F for 8-10 minutes until edges barely golden.
- Cool layers completely on wire racks
- Trim edges with a sharp knife for uniform rectangles
- Chill sheets 15 minutes before stacking
Thin layers ensure balanced textures when assembled. As pastry chef Gina Marconi advises:
“Treat each sheet like delicate lace—handle with care, and they’ll reward you with clean cuts.”
Mastering Italian Rainbow Cookies
The difference between good and exceptional layered treats lies in mastering foundational techniques. Authentic flavor starts with properly preparing your almond paste—the soul of this dessert.
Enhancing Almond Flavor with Authentic Techniques
Begin by creaming almond paste with room-temperature butter and sugar. Use a stand mixer’s paddle attachment to break the paste into a sandy texture—tiny lumps create air pockets for a tender crumb. Pastry chefs emphasize:
“That gritty texture isn’t a flaw—it’s your batter’s secret weapon. Those sandy bits melt during baking, releasing concentrated almond oils.”
Three techniques elevate your results:
- Mix batter just until combined—overworking develops gluten, making layers tough
- Use gel food coloring sparingly—vibrant hues require only ¼ tsp per layer
- Chill batter 10 minutes before spreading—it firms up for cleaner edges
Patience pays off when stacking layers. Let each sheet cool completely before applying jam. If layers slide, refrigerate the stack for 15 minutes. This sets the jam’s pectin, acting as edible glue.
For uniform slices, use a serrated knife dipped in hot water. Wipe the blade between cuts—sticky edges mean messy layers. Though time-intensive, these methods transform basic ingredients into a dessert that balances nutty richness with fruity brightness.
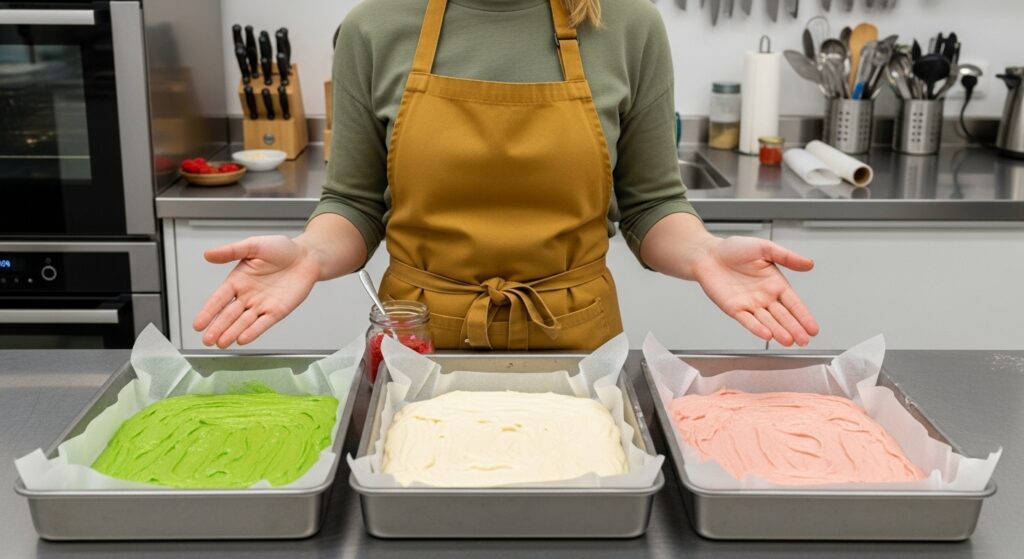
Layering and Assembling the Cake
The art of assembling these treats lies in precision and patience. After baking, you’ll transform delicate sheets into a cohesive masterpiece through careful stacking and pressing. Each step ensures the final product holds its iconic structure when sliced.
Spreading Jam Evenly Between Layers
(Italian Rainbow Cookies)
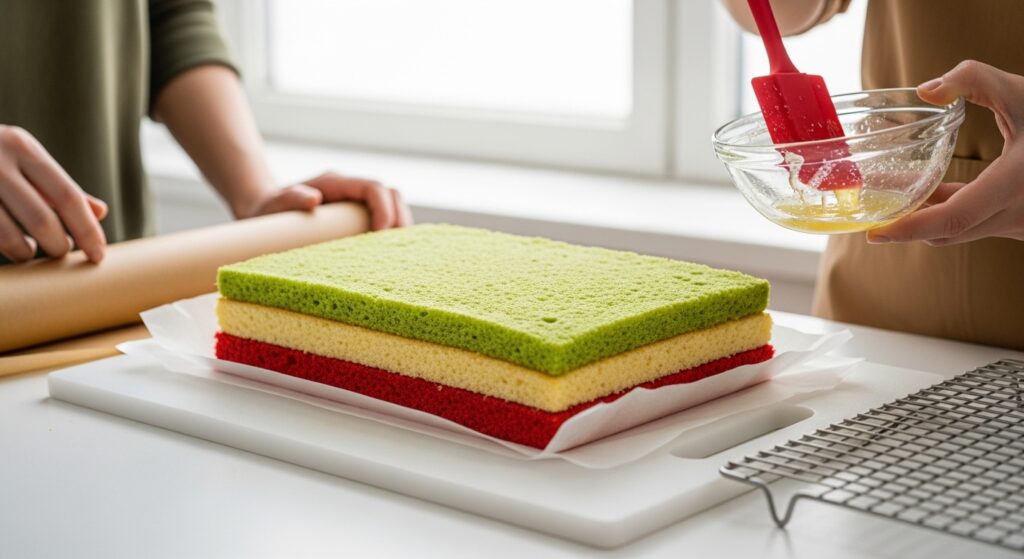
Cool each cake layer completely on a wire rack. Use parchment slings to lift them from the pan without tearing. Place the first sheet (traditionally colored with green food dye) on a flat surface.
With an offset spatula, spread a thin layer of raspberry jam. Aim for 1/8-inch thickness—too much causes sliding. Pastry chef Lucia Ferraro advises:
“Pretend you’re painting a canvas. Even pressure prevents jam from pooling at the edges.”
Repeat with the second layer (undyed or white), then the third (using red food coloring). Align edges perfectly to mirror the traditional tri-color pattern.
Compressing Cake Layers for a Dense Texture
Place a baking sheet atop the stacked layers. Add weights like canned goods or a cast iron pan. This pressure melds the sheets into a unified block.
- Refrigerate for 2 hours minimum—overnight yields cleaner cuts
- Rotate the stack halfway through chilling for even compression
- If layers shift, chill 15 minutes before resuming
The weight squeezes air pockets out, creating that signature dense crumb. For extra stability, wrap the stack in plastic before pressing. When ready, you’ll slice through firm, jam-bonded layers that hold their shape.
Effective Use of Food Coloring and Techniques
Color transforms these layered treats into edible art. Achieving bold hues requires strategy—baking dulls some shades while intensifying others. Whether using commercial dyes or natural alternatives, precision ensures your layers mirror the iconic flag-inspired palette.

Mastering Gel Dyes for Maximum Impact
Gel food coloring delivers intense color without thinning your batter. Start with ¼ teaspoon per layer, mixing thoroughly. If the shade looks faint, add 2-3 drops incrementally. Pastry chef Lena Torres advises:
“Test dye potency on a spoonful of batter before committing. Colors deepen slightly during baking, especially red.”
For the green layer, combine leaf green with a touch of yellow. The red layer benefits from a mix of red and pink gels to prevent muddy tones. Always use clean utensils to avoid cross-contamination.
Natural Options and Application Tips
Beet powder creates earthy red tones, while matcha lends a muted green. These alternatives require 1-2 teaspoons per layer. Since natural dyes fade faster, bake layers 1-2 minutes less to preserve vibrancy.
- Mix powders with 1 tsp water before adding to batter
- Store leftover colored batter in an airtight container for touch-ups
- Chill layers at least 2 hours to set colors before stacking
Regardless of method, uniform application matters. Spread batter in thin, even sheets on parchment-lined pans. This prevents color variations and ensures clean lines when sliced.
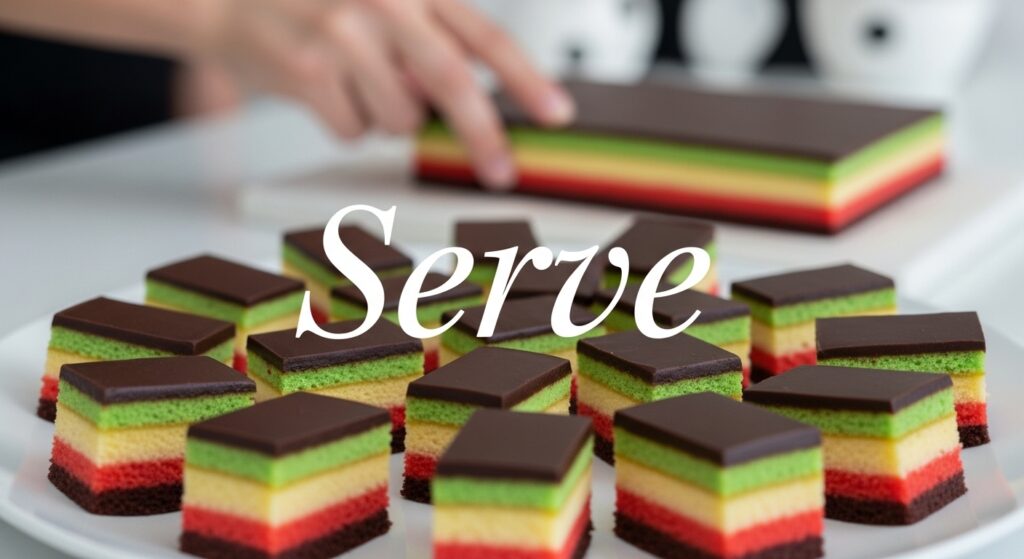
Cutting, Decorating, and Final Touches
The final transformation turns your layered masterpiece into shareable delights. Precision here ensures every slice mirrors the vibrant stripes you’ve worked so hard to create. Let’s refine those edges and add a glossy finish worthy of pastry case displays.
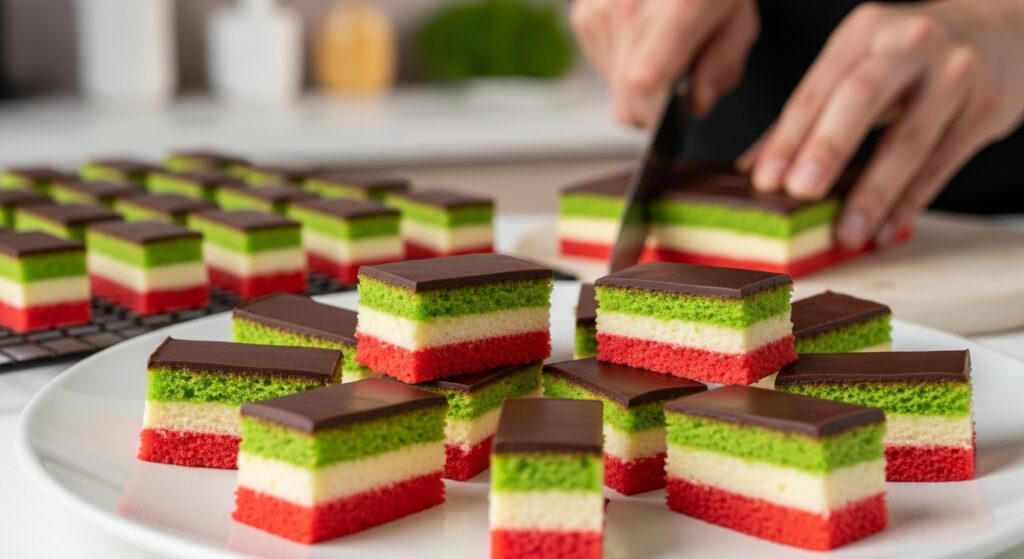
Sharp Tools for Clean, Crumb-Free Slices
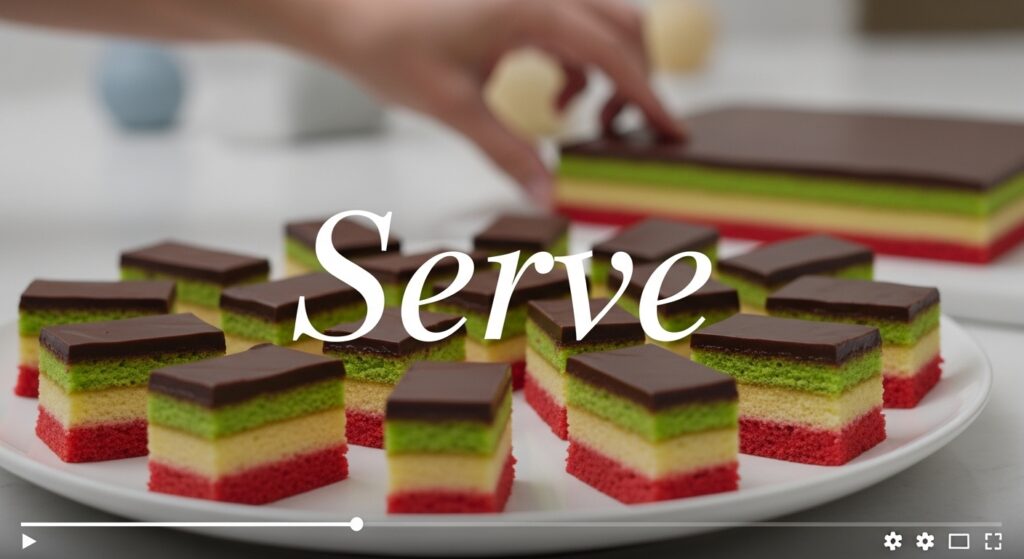
Remove chilled layers from the baking sheet and trim uneven edges with a serrated knife. Dip the blade in hot water and wipe dry before each cut—this melts lingering jam for smooth slices. Pastry chef Carla Monti recommends:
“Cut lengthwise first to create 1-inch strips. Chill 10 minutes, then slice crosswise for perfect bite-sized rectangles.”
Work swiftly but gently. If chocolate cracks, warm the knife slightly. Store trimmed pieces between wax paper sheets to prevent sticking while decorating.
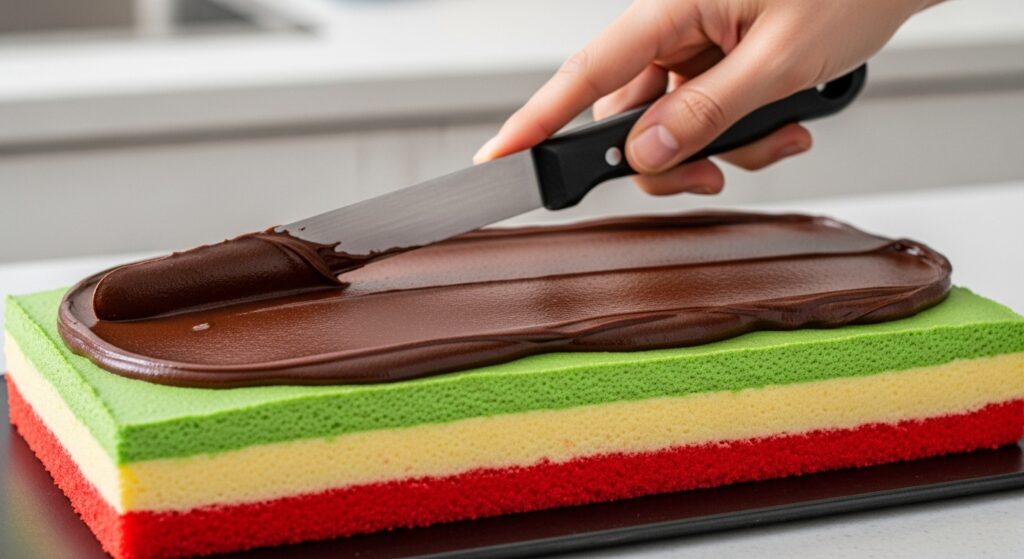
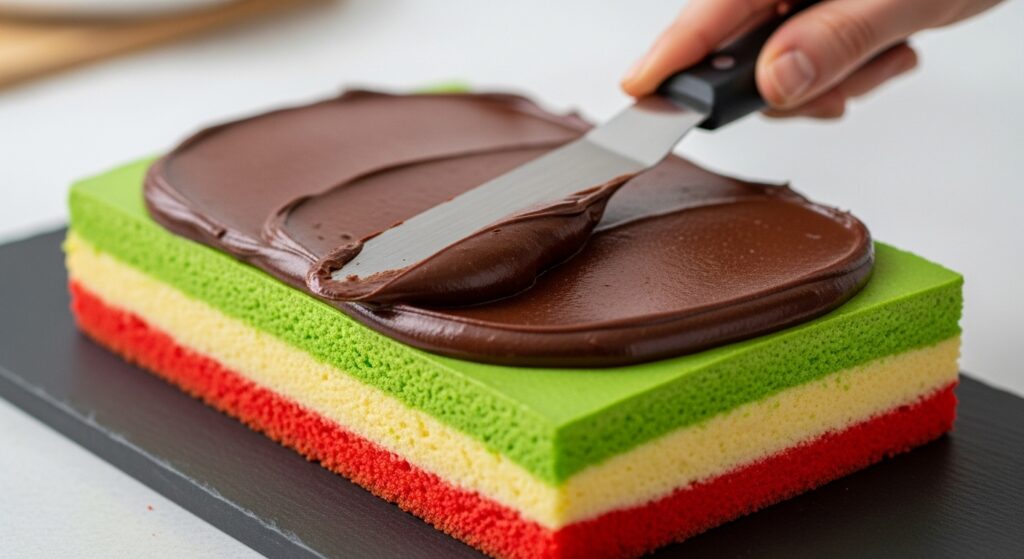
Chocolate’s Shiny Finale (Italian Rainbow Cookies)
Melt bittersweet chocolate in 30-second bursts, stirring until smooth. Pour over the top layer, using an offset spatula to coax it over the edges. For decorative swirls, drag a fork through the coating before it sets.
- Let chocolate harden at room temperature (45-60 minutes)
- Avoid refrigeration—it causes condensation spots
- Re-melt leftover chocolate for drizzle accents
Once set, transfer pieces to an airtight container with parchment dividers. They’ll stay fresh for up to two weeks—if they last that long!
Conclusion : Italian Rainbow Cookies
Crafting these vibrant layered treats is a rewarding journey through flavor and tradition. From their rich cultural roots to the final chocolate drizzle, each step honors the care behind this iconic dessert. Authentic almond paste remains non-negotiable—its earthy depth can’t be replicated by shortcuts or substitutes like almond extract.
Success hinges on technique: thin, even layers baked just until set, precise jam spreading, and weighted chilling. The glossy chocolate finish isn’t just decorative—it seals in freshness while adding bitter-sweet contrast. For clean slices, always use a warmed knife and work methodically.
Store your creations in an airtight container layered with plastic wrap to prevent sticking. They’ll stay fresh at room temperature for up to a week, though they rarely last that long. Share them at gatherings or savor one with afternoon coffee—each bite celebrates patience meeting passion.
While time-intensive, every minute invested yields a treat that dazzles eyes and palates alike. Once you master the rhythm of mixing, layering, and pressing, you’ll understand why these cookies have endured generations. Ready to create edible art? Your kitchen awaits. Italian rainbow cookies.
FAQ :Italian Rainbow Cookies
Can I substitute marzipan for almond paste in this recipe? Italian rainbow cookies.
No—almond paste has a higher almond content and less sugar than marzipan, which is critical for achieving the authentic flavor and texture. Using marzipan may result in overly sweet, dense layers.
How do I prevent the layers from sticking to the pan? Italian rainbow cookies.
Line your baking sheet with parchment paper and lightly grease it. This ensures easy removal while maintaining the thin, even structure needed for stacking.
What’s the best way to achieve vibrant red and green layers?
Use gel-based food coloring for intense shades without altering the batter’s consistency. For natural alternatives, try beet powder (red) or spinach powder (green), though results may be subtler.
Why does the cake need to chill for several hours?
Chilling compresses the layers, melds the jam, and stabilizes the structure. Skipping this step risks crumbling when slicing or coating with chocolate. Italian rainbow cookies.
How do I create clean, even cuts on the finished cookies?
Use a serrated knife dipped in hot water and wiped dry. This method minimizes cracks and ensures smooth edges for a polished presentation.
Can I freeze these cookies for later use?
Yes! Store them in an airtight container with wax paper between layers. They freeze well for up to 3 months—thaw at room temperature before serving.
Why is raspberry jam traditionally used between layers?
Its tartness balances the sweetness of the almond batter. For variations, try apricot or blackberry preserves, but avoid overly chunky or sugary spreads. Italian rainbow cookies.


Best Italian Rainbow Cookies Recipe – Easy & Authentic
Description
These Italian rainbow cookies (also known as tricolor or Venetian cookies) are a beloved bakery classic featuring almond-flavored sponge cake layers tinted with food coloring, sandwiched with fruit jam, and finished with a rich chocolate glaze. (Italian rainbow cookies).
Italian Rainbow Cookies Recipe
Biscuits Arc-en-Ciel Italians
Colorants naturels ou en gel (betterave, spiruline, curcuma pour version sans additifs)
Pour l’assemblage :
Nutrition Facts
Servings 9
- Amount Per Serving
- % Daily Value *
- Total Fat 8g13%
- Saturated Fat 3.5g18%
- Cholesterol 25mg9%
- Sodium 50mg3%
- Potassium 70mg2%
- Total Carbohydrate 17g6%
- Dietary Fiber 0.5g2%
- Sugars 12g
- Protein 2g4%
- Vitamin A 95 IU
- Calcium 12 mg
- Iron 0.5 mg
- Vitamin D 4 IU
- Vitamin E 0.6 IU
- Vitamin K 1 mcg
- Thiamin 0.004 mg
- Riboflavin 0.05 mg
* Percent Daily Values are based on a 2,000 calorie diet. Your daily value may be higher or lower depending on your calorie needs.
Note
- La pâte d’amande maison peut être faite avec 100 g de poudre d’amande, 100 g de sucre glace et un peu de blanc d’œuf.
- Pour une version sans gluten, utilisez un mélange de farine sans gluten tout usage.
- Le beurre peut être remplacé par de la margarine végétale pour une version sans produits laitiers.
- Pour une option plus fruitée, remplacez les confitures par des purées de fruits épaissies au pectinex.
Souhaitez-vous une version végane, sans gluten, ou allégée ? Je peux adapter ces ingrédients selon vos besoins exacts.
